


Graveyard Dirt Cake Cups - Easy No-Bake Halloween
These Graveyard Dirt Cake Cups are a fun, no-bake Halloween dessert layered with creamy chocolate pudding, Oreo “dirt,” and gummy worms, finished with cookie “tombstones.” Served in clear cups, they’re kid-friendly and party-ready, perfect for school events, potlucks, or spooky movie nights.

Whether you’re after a festive Halloween dirt cups idea, an easy treat for kids, or a playful twist on a classic dirt cake recipe, these Oreo dirt cups come together in minutes and always disappear fast. So grab your cups and let’s dig in!
Here’s what you’ll need for your fun dirt cake cups:

- Chocolate pudding mix: The instant chocolate pudding gives this dessert its rich, creamy chocolate base. If you’re worried about sugar, you can use sugar-free chocolate pudding mix instead.
- Cold milk: It helps set the pudding to the perfect consistency.
- Cream cheese: Cream cheese adds a tangy creaminess that balances the sweetness.
- Cool whip: It lightens the filling and makes it fluffy.
- Powdered sugar: Powdered sugar adds a hint of sweetness to the cream cheese mixture.
- Vanilla extract: for depth of flavor.
- Unsalted butter: helps bind the cookie crumb layers.
- Oreos: These chocolate sandwich cookies are crushed into crumbs to resemble dirt.
- Gummy worms: They are playful, chewy toppings that kids love.
- Halloween sprinkles: They add seasonal flair and color.
- Black writing gel: Perfect for drawing spooky touches on top of your dirt pudding cups.
Ready to bring these spooky treats to life? Follow the simple steps below to make your own Graveyard Dirt Cake Cups.


Prepare the pudding: Start by making your chocolate pudding according to the package directions. For mine, it meant whisking the pudding mix with 2 cups of cold milk until thickened. Set aside to chill while you prep the rest.
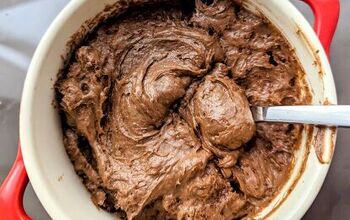
Mix the cream cheese layer: In a separate bowl, beat the softened cream cheese and butter together with an electric mixer until smooth and creamy. Add the powdered sugar and keep mixing until fully combined, then blend in the vanilla extract.


Combine the mixtures: Gently fold the cream cheese mixture into the pudding until everything is well blended. Add the Cool Whip and stir just until combined; don’t overmix, or you’ll lose that fluffy texture. Cover the bowl with plastic wrap and refrigerate while you crush the cookies.


Make the “dirt”: Place Oreo cookies in a zip-top bag and crush them with a rolling pin until they resemble fine crumbs. These will become the “dirt” layers in your dirt cake cups.
Create tombstone cookies: Use black writing gel to write “RIP” on Milano cookies for your spooky tombstones. Set them aside to dry.


Layer the cups: Spoon about one tablespoon of crushed Oreos into the bottom of each serving cup. Add a scoop of the pudding mixture and smooth it out with the back of a spoon or an ice cream scoop. Repeat with another Oreo layer and another pudding layer. Finish with a generous sprinkle of cookie crumbs on top (about two tablespoons).


Chill: Place the layered cups in the fridge for at least 30 minutes to set.

Decorate before serving: Just before serving, add your cookie tombstones, gummy worms, and festive Halloween sprinkles. This keeps the cookies crisp and the candy worms from getting soggy. Enjoy!
Want your Graveyard Dirt Cake Cups to look extra spooky and hold up perfectly? These simple pro tips will take your no-bake Halloween dessert to the next level.
Crush your Oreos two ways: fine crumbs for the body of the cup and a slightly chunkier layer on top for that realistic “soil.” Build in this order for clean lines: crumbs → pudding → crumbs, finishing with a generous dirt cap so decorations don’t sink.

For sturdy gravestones, use Milano or Biscoff cookies and press them into the semi-set pudding; pipe “RIP” with melted chocolate or black gel. Want a darker, more chocolatey graveyard? Sift a teaspoon or two of cocoa into the top crumb layer.
These no-bake Halloween desserts are make-ahead friendly: assemble the cups (without toppings) up to a day in advance, cover, and chill. Add the gummy worms and cookie tombstones when you’re ready to serve.

If you want your gummy worms to look extra realistic, chill them in the fridge before adding them to the dirt cups. The cool temperature makes them stiffer and helps them hold their “wiggle” when sticking out of the pudding.
These Graveyard Dirt Cake Cups are the perfect make-ahead no-bake Halloween dessert, and storing them is a breeze. Simply cover each cup with plastic wrap or place them in an airtight container, then refrigerate for up to 3 days. For the best results, add your decorations—like cookie tombstones and gummy worms just before serving to keep everything fresh and crisp.

Since this is a chilled dessert made with pudding and whipped topping, there’s no need to reheat. In fact, they’re best served cold right from the fridge. If the pudding thickens too much or the cookies soften over time, just give the cup a gentle stir before topping and serving.
These Graveyard Dirt Cake Cups are super easy to customize, so you can get creative with flavors and toppings while keeping that spooky Halloween vibe.

Swap the classic chocolate pudding for vanilla, cookies, and cream, or even pumpkin spice to switch up the base flavor. You can also use flavored Oreos like mint or red velvet for a fun twist on the “dirt.”
For a kid-friendly color pop, add Halloween sprinkles, candy bones, or gummy eyeballs on top. Want a birthday version? Skip the tombstones and decorate with rainbow sprinkles and edible googly eyes.

To make these Oreo dirt cups allergy-friendly, try gluten-free Oreos and use dairy-free pudding with coconut whipped topping for an easy vegan dirt cake version.
No matter how you mix them up, these no-bake Halloween desserts are always a hit at any event.
These Graveyard Dirt Cake Cups are rich and chocolatey, so they pair best with lighter Halloween snacks or savory bites to balance the sweetness.

If you’re planning a Halloween menu, serve these alongside savory finger foods like mummy hot dogs, Jack Skellington cookies, spiderweb pizzas, or stuffed peppers carved like jack-o-lanterns. The playful mix of spooky, delicious dishes and sweet Halloween dirt cups makes for a memorable party table.
For something simpler, dirt pudding cups pair beautifully with a glass of cold milk or a cup of hot coffee for the adults.
These no-bake Halloween desserts make the perfect sweet ending to any spooky celebration!

Dirt cake has been a favorite dessert for decades, and these dirt cake cups put a fun, modern spin on the classic—no-bake, kid-friendly, and easy to add to your go-to dessert list.
These Graveyard Dirt Cake Cups make a spooky, cute no-bake Halloween dessert that comes together in minutes and disappears fast. Top your Oreo dirt cups with cookie tombstones, candy pumpkins, or bones, then chill until party time. And don’t forget the messier the gummy worms, the more fun the dessert.
Yes! You can make dirt pudding cups a day in advance. Just store them in the fridge in clear plastic cups and cover them with plastic wrap. Add gummy worms and sprinkles right before serving so they stay fresh and colorful.
Can I use homemade whipped cream instead of Cool Whip?Definitely! Homemade whipped cream works beautifully in this dirt cake recipe. Whip heavy cream with a little powdered sugar until soft peaks form, then fold it into the pudding mixture. It makes the dirt cups taste even fresher.
What size cups should I use for dirt pudding cups?Clear plastic cups are perfect because you can see all the fun layers of pudding mixture and Oreo dirt. Eight ounce cups are a good standard size, but you can use smaller cups for kids or larger ones for parties.
Are dirt cake cups only for Halloween?Not at all. Halloween dirt cups with gummy worms and spooky sprinkles are the most popular, but this dessert works year-round. For birthdays, swap sprinkles to match the theme. For summer, add gummy fish instead of worms. The options are endless!
What’s the difference between dirt cake and dirt cake cups?A traditional dirt cake recipe is usually made in a big dish or trifle bowl. Dirt cake cups are single-serve versions layered in cups, which makes them easier to serve at parties and keeps everything neat.
Can I make graveyard dirt cups with this recipe?Yes! To make graveyard dirt cups, add a Milano cookie or graham cracker “tombstone” to the top and write “RIP” with black writing gel. It’s a fun Halloween dessert that kids love to help decorate.
Can I use different pudding flavors?Of course. Instant chocolate pudding is the classic choice, but you can use vanilla, white chocolate, or even cheesecake pudding mix for a twist. The pudding mixture base is flexible, so have fun experimenting.
Is this dirt cups recipe kid-friendly?Absolutely. Kids can help crush Oreos, layer the pudding, and decorate with worms and sprinkles. It’s one of those easy desserts that doubles as an activity.


Graveyard Dirt Cake Cups - Easy No-Bake Halloween
Recipe details
- 10 cups
- Prep time: 25 Minutes Cook time: 30 Minutes Total time: 55 min


Comments
Share your thoughts, or ask a question!