


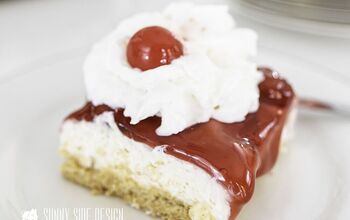
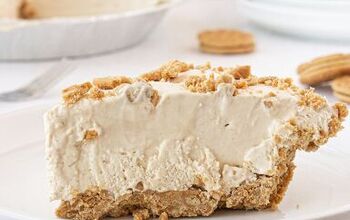
Cherry and Cream Cheese Pie

This Cherry and Cream Cheese Pie has a graham cracker crust, a no-bake cream cheese filling, and a sweet cherry pie topping. It is an easy dessert, perfect for the summer and winter, and is a favorite at family gatherings.

I’ll make several pies for Thanksgiving, and this is often one of the first to go. It really is creamy and delicious. The hint of vanilla and lemon with the whipped cream and cream cheese is lovely by itself and even better with the cherry topping. I have often made this with gluten-free graham crackers for those needing a gluten-free option. You can buy gluten-free cherry pie filling, Lucky Leaf is a brand that offers it and others.
I love that it is easy. It’s a quick Graham cracker crust with a no-bake cheesecake filling topped with canned cherry pie topping! I don’t have to make a topping, and the crust and filling are easy to make in advance, as the creamy filling needs to be refrigerated for a few hours. The oven is only on for the crust, so it’s a perfect summer and winter dessert. It’s so pretty too, the cherry filling is perfect for the summer holidays and at Christmas.
Looking for another cream cheese dessert? Try our favorite Cream Cheese Puff Pastry Danishes, which are delicious for dessert or for a special brunch.

You will need the following ingredients:
- Graham crackers
- Granulated sugar
- Butter
- Cream cheese
- Powdered sugar
- Fresh lemon juice
- Vanilla
- Whipping cream
- Cherry pie filling
I know what it’s like when you don’t have everything on hand and the last thing you want to do is run to the store and pick something up. Here are a few ideas to substitute items on the ingredients list if needed:
- If you’re not a fan of cherry pie topping, you can try other berry toppings like strawberry or blueberry.
- A store-bought graham cracker crust could be substituted for the homemade.
- You could use all vanilla or all lemon juice to flavor the cream cheese filling.
- If you don’t like canned pie filling, you can make your own fruit compote for the top. We love it with a homemade blueberry or strawberry sauce, and a cherry compote would be lovely with it too.


Step 1. Using a food processor or a rolling pin with a large ziploc bag, crush the Graham crackers into as fine a crumb as you can. If using a food processor, add the sugar with the graham crackers when you crush them. If using a bag, pour the crumbs into a small bowl and stir in the sugar. Stir or process in the melted butter.
Step 2. Pour the crumbs into a 9-inch pie pan. Using your hands, press the crumbs into the bottom and up the sides of the pan using gentle pressure. After using your hands, use the bottom of a measuring cup to press the bottom of the Graham cracker crust so that it is even. Then, use a spoon to press in at the seam of the bottom and sides of the crust.


Step 3. In a medium-sized bowl, using an electric mixer or a stand mixer, beat the cream cheese so that no lumps remain. Beat in the powdered sugar, lemon juice, and vanilla. In a separate medium-sized bowl, using an electric mixer, whip the cream until stiff peaks form.
Step 4. Fold the whipped cream into the cream cheese mixture. This will take several strokes to ensure it is all incorporated.


Step 5. Pour the filling into the cooled crust. Using a spatula or an offset/angled spatula, spread the filling into the crust to form a smooth, even layer. Chill for at least 3 hours up to overnight.
Step 6. Pour the cherry pie filling over the top of the cream cheese layer. Chill for an additional hour or until ready to serve.

- Have you had problems with your Graham cracker crust falling apart? When assembling the Graham cracker crust, you want to apply gentle pressure with your hand as you press the crumbs into the bottom of the pan and up the sides. You don’t want any loose crumbs, and you also don’t want it extremely firmly packed. After using my hands to press the crumbs, I use the bottom of a measuring cup to gently press the crumbs on the bottom for a smooth crust. I then use a spoon to press the crumbs at the seam of the bottom and sides. The spoon helps create a curved edge at the seam. You don’t want a 90-degree angle at that seam, or the sides of the crust can more easily detach from the pie when you serve it.
- Once the bottom and sides are pressed together, I use the finger of one hand to press on the top crumbs, while using my other hand to hold the side crumbs in place. This helps create a nice line for the top of the crust while ensuring you don’t have any loose crumbs.
- A food processor makes crushing the Graham crackers so easy. I have a Ninja food processor that came as an attachment with a blender I bought a few years ago. It has worked really well for me and I use it for many things, including Graham cracker crusts and traditional pie crusts.
As an Amazon Associate, I earn from qualifying purchases.


Cherry and Cream Cheese Pie
Recipe details
- 6-8 slices
- Prep time: 15 Minutes Cook time: 10 Minutes Total time: 25 min


Comments
Share your thoughts, or ask a question!
Deb, there is only 2/3 çup of added sugar, plus the sugar in the pie filling. Like the recipe states, you can use fresh fruit and probably Cool Whip to avoid the fat and sugar.
Always a crowd pleaser. Delicious every time and so simple too!