


How to Make Cake Pops, But Better: Red Velvet Cake Pucks
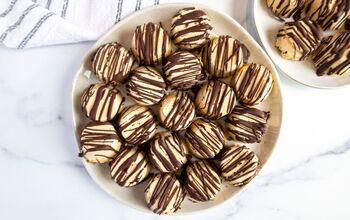
Searching for how to make cake pops without the mess? Meet cake pucks. These red velvet cake pucks are the simpler, sleeker version of cake pops, bite-sized, silky in the middle, and coated in a snappy white chocolate shell. Made in Benty silicone molds, they skip the rolling and dipping while delivering bakery-style results every time. Perfect for parties, gifting, or giving new life to leftover cake, they're everything you love about cake pops, only better. Prep Time: 45 minutes | Chill Time: 30 minutes | Yield: ~12 cake pucks (6-8 servings)
Earlier this summer, I baked my Ultimate Red Velvet Cake to celebrate something far bigger than a birthday or holiday, it was a graduation cake for Ashlyn, a brave young woman whose story is marked by trauma, redemption, and the kind of joy only God can write. Ashlyn's journey from foster care to college is one I'll never forget, and it felt only right to honor it with her favorite dessert: red velvet cake with cream cheese frosting.
We served her favorite dessert, hugged tightly, and yes, there were leftovers. Good ones. A few days later, I repurposed that same cake into these dreamy red velvet cake pucks. And friend, they are not your average cake pops.

If you've ever wondered how to make cake pops at home, you know the process can be messy, rolling, dipping, keeping them upright on sticks. Cake pucks take the same idea (cake + frosting + chocolate coating) and make it easier. Instead of fiddling with sticks, the filling is pressed into a mold, sealed with chocolate, and popped out with clean edges every time. You get the same bite-sized joy of cake pops, but without the hassle.
Let's talk truth: cake pops are cute, but they're not exactly forgiving. Between rolling, crumbling, sticking, dipping, and keeping them upright, they can turn into a time-consuming mess-especially for a busy mom trying to bake with little helpers at her side.
Cake pucks solve all of that:
- No crumbling cake balls that fall apart mid-dip
- No lollipop sticks or stand needed
- Clean, consistent shapes every time
- Easier to make ahead, stack, and gift
And best of all? They taste just like cake pops, but with a sleeker, more modern twist. Think of these as cake pops all grown up.
- Silky-smooth and rich on the inside, like a truffle
- Wrapped in a crisp, white chocolate shell that snaps when you bite in
- Made in two easy ways using a Benty Cake Puck Mold (no special skills needed)
- Customizable with any cake + frosting combo you love
- Perfect for freezer stashing, party trays, or edible gifting
Before we dive into cake puck magic, let's talk about the three key ingredients that make this recipe a win for busy bakers, sweet celebrations, and little hands in the kitchen.
The Mold
The Cake
The Frosting

- ½ red velvet cake, fully cooled (store-bought or homemade-this is the one I used: Ultimate Red Velvet Cake)
- 1 small batch buttercream frosting, just enough to bind (I used my cream cheese version)
- 10 oz white chocolate melting wafers
- 1-2 teaspoon vegetable or coconut oil, if needed to thin the coating
- Benty Cake Puck Molds (silicone)
- Mixing bowl & spatula (or gloved hands)
- Microwave-safe bowl or double boiler
- Small offset spatula or spoon
- Parchment-lined baking sheet
- Optional: digital thermometer
This recipe assumes you are buying a store bought cake, or making one from scratch. Use any of our cake recipes if you need some inspiration.
- Crumble the cake
Break the cooled red velvet cake into fine, even crumbs in a large bowl. Discard any overly browned or hard edges. - Add buttercream (just enough)
Start with ¼ cup of frosting and work it in with gloved hands or a spatula. Add more a spoonful at a time until the mixture holds together like soft cookie dough-moist but not sticky. - Portion the filling
Pinch off portions that match your mold cavities (typically 25-35 grams for standard pucks) and press gently into a ball.
There are two ways to make the pucks. I prefer the second method (Method B) as they look more like professional pucks; but, I have found that Method A is a bit easier and quicker. Both would work great!
The secret to making fool-proof homemade cake pucks is the Benty Cake Puck Mold Set! No hassle with dipping cake balls or lollipop sticks.
Method A: Press‑and‑Dip (The Fastest Cake Pop Hack)
- Pack the molds
Press filling firmly into each mold cavity, leveling off the tops. - Chill
Freeze the mold for 20-30 minutes until the pucks are firm. - Melt the coating
Microwave white chocolate at 50% power in 20-30 second intervals until mostly melted. Stir until smooth. Add 1-2 teaspoon oil if the coating is too thick; it should flow like warm honey. - Unmold & dip
Pop the pucks out onto parchment. Dip the top of each puck into the melted chocolate, lift straight up, and gently scrape the bottom edge on the bowl's rim. Place on parchment to set. - Decorate (optional)
Add sprinkles, drizzle extra chocolate, or top with red velvet crumbs while the coating is still wet.
Method B: Molded Shell (Professional Look, No Stick Required)
- Prime the cavities
Spoon ~1 teaspoon melted white chocolate into each mold. Tilt to coat the bottom and a bit up the sides, or use a spoon to guide it. - Set the shell
Chill 5 minutes until firm. - Add the filling
Press in a portion of cake filling, leaving a bit of space at the top for the "lid." - Seal the bottoms
Cover the filling with more melted chocolate and level it off with a spatula. - Chill & unmold
Refrigerate 15-20 minutes, then gently pop the pucks out of the molds for a perfectly smooth finish.
One of my favorite things about cake pucks (besides how easy they are) is how customizable they can be. Whether you're prepping for a birthday, holiday cookie tray, or church potluck, these little beauties are a blank canvas waiting for your touch.
Here are some of my go-to ways to dress them up, plus a few creative ideas I've used in real-life bakes (and always get asked for again):
Classic Crumb Topping
Drizzle It Up
Seasonal Add-Ons
Nutty & Grown-Up
Kid-Friendly Fun
Tuxedo Vibes

Baking at home doesn't mean settling for less. These cake pucks can look and taste bakery-quality, especially with a few smart tips I've learned after many batches and lots of trial and error (so you don't have to).
Set at room temp, or use the fridge when needed
Don't rush the unmolding
Watch for gaps or thin edges
Texture trouble? Here's how to fix it:
- Too crumbly: Add more frosting, just a teaspoon at a time, until the mixture holds together like soft cookie dough.
- Too sticky: Chill the mixture for 10 minutes, or fold in a bit more cake crumb for balance.
- Thick coating: Warm the chocolate gently and stir in ½ teaspoon of oil at a time until it flows like warm honey. Don't overdo it-you want a snappy finish, not a soft one.
- Cracked tops after dipping: Let pucks rest at room temp for 5 minutes before dipping. If your chocolate is too hot, let it cool slightly to avoid shocking the cold centers.
- Hard to press the filling into the mold? Your chocolate layer may be too thick or cool. Rewarm slightly or thin with a touch of oil.
Want clean, professional edges?
- Fridge: Store your cake pucks in an airtight container in the refrigerator for up to 1 week. For best texture, let them sit at room temperature for 5-10 minutes before serving.
- Freezer: These freeze beautifully! Place them in a single layer on a parchment-lined tray until solid, then transfer to a freezer-safe container with parchment between layers. They'll keep for up to 2 months. When ready to enjoy, thaw in the fridge overnight. To avoid sticky or streaky chocolate, leave the container uncovered while thawing so condensation doesn't form on the coating.
Absolutely! While red velvet is a classic (and our family favorite), you can use chocolate, vanilla, spice, lemon, whatever you have on hand or love most. Just be sure it's fully cooled before crumbling.
Do I have to use Benty molds?You don't have to, but I highly recommend them. The Benty silicone molds make these cake pucks look professional, with clean edges and a glossy finish; no dipping sticks or messy rolling required.
Can I make these ahead of time for a party or holiday tray?Yes! These are perfect for make-ahead baking. Once coated, store them in the fridge for up to a week or freeze for up to two months. Just let them thaw in the fridge before serving.
How do I keep the coating from cracking?If your pucks are too cold or the chocolate is too hot, cracks can happen. Let your pucks sit out for 5-10 minutes after freezing, and make sure your chocolate is warm, not piping hot. Stirring in a little oil helps too!
Are these safe for kids to help with?Definitely! Little hands can help crumble the cake, roll the filling, or add sprinkles. Just be sure a grown-up handles the chocolate melting and dipping. It's a fun family project with sweet results!
Whether you're honoring a milestone, gifting something special, or simply giving new life to leftover cake, these red velvet cake pucks are little circles of love. They're a reminder that even what's left over can be made new, into something beautiful, something worth sharing.
So go ahead, friend, grab that extra cake, melt a little chocolate, and make something memorable. Whether you're baking with your kids, prepping a gift box, or sneaking one for yourself after bedtime, these cake pucks are your chance to turn simple ingredients into sweet joy. Let's bake with purpose... and maybe a little powdered sugar on our aprons.
Ready to get started? The full recipe is just below! 👇
Looking for an easy alternative to cake pops? These red velvet cake pucks deliver the same charm (bite-sized, chocolate-covered, and crowd-pleasing), without the hassle of sticks or messy dipping. Shaped in silicone molds, they come out smooth, glossy, and gift-ready every time.
Whether you call them cake balls, cake bites, or no-stick cake pops, these cake pucks are simpler to make, easier to decorate, and perfect for parties, holidays, or freezer-friendly treats. Try them once and you may never go back to cake pops again.
If you make these, I'd love to see! Tag @TheBakersTableSC on Instagram so we can share in your kitchen joy. For more easy family-friendly recipes, don't miss our Best No Bake Oatmeal Cookies, another classic our kids ask for again and again.
About Kendra Boettner
Hi, I'm Kendra. Wife. Mom of three. And the home baker behind The Baker's Table. I've spent more than 15 years baking from scratch, a passion first kindled in my mother's kitchen where I learned to stir, knead, and bake with purpose and love.
Over the years, I've tested and perfected hundreds of original recipes, worked in professional restaurant kitchens, and built a thriving baking community rooted in faith and hospitality. Whether it's cinnamon rolls for Sunday brunch or cookies for the school bake sale, I believe baking is one of the most personal ways we can nourish others and make a house feel like home.
Today, I develop every recipe on The Baker's Table with our readers in mind: home bakers who value real ingredients, dependable instructions, and a little encouragement along the way. My recipes have been featured on Pinterest's trending boards and shared by bakers who return time and again for their family favorites.
Behind the scenes, my husband Eric manages our technology, digital strategy. and SEO. He brings 20 years of leadership experience from Fortune 500 companies to ensure the site runs smoothly and reaches the right readers.
Beyond the kitchen, I serve as Director of Operations at Lily Pad, a nonprofit supporting foster care families in our community. Whether I'm behind the mixer or coordinating care packages, my heart remains the same. To offer connection, comfort, and something sweet to share.
🧁 Want to see what others are baking? Join me on Instagram, Facebook, and Pinterest
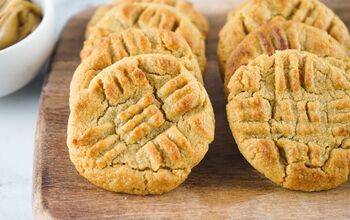
- Best No Bake Oatmeal Cookies
- The Best Homemade Brownies (Chewy, Fudgy & Gluten-Free!)
- Lemon Meringue Bars with Swiss Meringue - A Bright, Tangy Dessert Favorite
How to Make Cake Pops, But Better: Red Velvet Cake Pucks
Recipe details
- 12 pucks
- Prep time: 45 Minutes Cook time: 0 Minutes Total time: 45 min


Comments
Share your thoughts, or ask a question!