


Dirt and Worm Cups
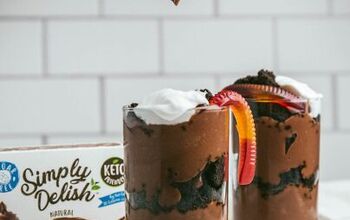
Our Dirt and Worm Cups are made with velvety chocolate pudding, cookie crumbs, and your favorite gummy treats for a fun dessert everyone will love. An edible “dirt” dessert that is perfect for parties, Halloween, springtime gatherings or anytime you want a sweet and nostalgic treat! For an extra touch, customize them with different candies, add an extra cookie layer, or serve in mini cups for an easy, no-mess treat that’s as fun to make as it is to eat.

Dirt and worms are a time-honored classic dish that every child loves to eat. It is a multi-layered dish consisting of chocolate pudding, crumbled cookies and gummy worms to garnish. While this dish is quite simple to make, it is a great way to introduce your kids to the kitchen and start building core food memories with your family.
Dirt and Worm Cups are a playful and kid-friendly dessert, made to look like worms crawling and emerging through dirt. They are made by layering crushed chocolate cookies, chocolate pudding, and gummy worms. This no-bake dessert is traditionally served in a clear cup, so that all layers are visible.
- No Bake: There is no need to heat up your oven for this dessert.
- Quick and Easy: This dessert comes together so quickly, so you won't have to wait too long before you get to dig in - pun intended.
- Great for Kids: Playful Dirt and Worm Cups are a huge hit with both kids and kids at heart.
- Minimal Ingredients: You will only need to gather 5 ingredients to put together a delicious dessert.
This is a pretty easy shopping list with everything being available at your local grocery store. You may even find that all these ingredients are already in your pantry so have a look before heading to the store.

See the recipe card below for the exact quantities of each ingredient.
- Cold Milk: Whatever kind of milk you prefer will work, just keep it cold.
- Chocolate Instant Pudding: Save time by using instant packets.
- Whipped Topping: Cool Whip tends to be our go-to option, but you can always make a homemade whipped cream.
- Oreo Cookies: We used classic chocolate Oreos.
- Gummy Worms: Buy whichever brand you like best.
For this recipe, you'll want to have on hand a hand mixer, food processor, individual clear plastic cups, measuring cups and spoons, and a large bowl.
What we love most about this recipe is that it can be fully customized. This is a great dessert to be creative and let each person top their own dessert cups with their favorite treats.
- Your Favorite Cookie: Feel free to try this recipe with any cookie you love, or even a Gluten-Free substitute. We love using Gluten Free Oreos when needed!
- Vanilla Pudding: Try making a vanilla version by swapping in homemade vanilla pudding or vanilla pudding from a store-bought mix.
- Your Favorite Candy: Any sweet or sour option will do.
Don’t get worried about the accuracy of presenting this dish. The fun is in the process of building a muddy, crunchy, chocolatey dessert.


Make the chocolate pudding, add in whipped topping and mix. Divide evenly amongst 8 cups, then top with Oreo crumbs. Set in the fridge for at least 2 hours or until ready to serve. When ready to serve add 2-3 gummy worms per cup and enjoy!
Hint: This dish is all about having fun—embrace the mess and enjoy the process. No need for perfection!


We recommend that once the cups are topped with Oreo crumbs they are eaten that day for the most freshness. The crumbs will start to absorb moisture from the pudding and start to get soggy the longer they sit. Alternatively, you can prep everything in advance, and assemble when ready to eat.
- Mini Pail: Serve in a mini pail with a lid for a fun presentation.
- Halloween Spoons: Add Halloween themed spoons for a festive twist.
- Spider Rings: Top with toy spider rings for a fun Halloween twist (when age appropriate, as this could be a choking hazard).

Since this dish is meant to be easy and fun, just enjoy this time with your family. You may make a bit of a mess but at the end of the day you will find yourself and others laughing with pudding all over your face.
You can substitute homemade pudding in place of the instant pudding if the volume is the same. Be mindful that it will increase total preparation time.
How long in advance can I make dessert cups before serving?For best result you should make them the same day you plan to serve them, but we have made them up to 3 days prior. While they are still delicious, the cookie crumbs to get a little “damp” feeling as they absorb the liquid from the pudding. We would recommend if you wanted to prep everything in advance, and assemble on the day you need them, that would give you the best result!

Check out some more of our recipes you will want to try!


Ready to get cooking? Save time by having a grocery list automatically generate for you by clicking the "Add to Shopping List" below.
We would be so grateful for you to leave us a rating and review on any recipes you try. If you make any alterations, let us know how they turned out.


Dirt and Worm Cups
Recipe details
- 8 servings
- Prep time: 10 Minutes Cook time: 5 Minutes Total time: 15 min


Comments
Share your thoughts, or ask a question!