


Tiramisu
Authentic Italian Tiramisu Recipe: Classic Italian Dessert Made Simple
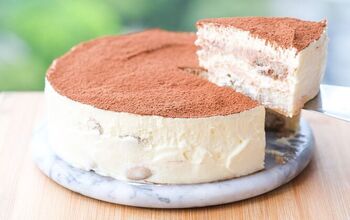
When it comes to Italian desserts, few can rival the fame of an authentic tiramisu recipe. Born in the Veneto region in the 1960s, this no-bake Italian dessert combines strong espresso, delicate savoiardi (ladyfingers), and a cloud of mascarpone cream. Its name translates to “pick me up,” a nod to both the caffeine kick and the comfort of its silky layers.
I still remember Nonna serving tiramisu after Sunday lunch, the aroma of coffee filling the kitchen as she dusted the top with cocoa. The anticipation was almost unbearable as it chilled overnight. One glance at those layered biscuits and cream, and we were sneaking spoonfuls before she even called us to the table. It wasn’t just dessert; it was tradition, love, and a little bit of Italian magic.

The secret is using strong espresso, authentic savoiardi ladyfingers, and freshly whipped mascarpone cream, then chilling overnight so the flavors blend beautifully.
- The authentic tiramisu recipe features strong espresso, savoiardi ladyfingers, and mascarpone cream, creating a rich dessert experience.
- Preparation takes 25 minutes, followed by a chilling time of 6 to 24 hours, ensuring the flavors meld perfectly.
- This no-bake dessert can be made ahead of time and serves 9-12 slices, being vegetarian and beginner-friendly.
- Key tips include quickly dipping ladyfingers, chilling overnight for optimal flavor, and dusting cocoa before serving.
- Tiramisu originated in the 1960s in Italy and symbolizes Italian culture, often enjoyed after meals during family gatherings.
- Course: Dessert / Dolce
- Prep Time: 25 minutes
- Chill Time: 6–24 hours
- Total Time: 6 hours 25 minutes
- Servings: 9–12 slices
- Difficulty Level: Easy
- Cuisine: Italian
- Dietary Tags: Vegetarian, No-Bake
For the Coffee Dip
- 1 ¼ cups (300 ml) strong brewed espresso, cooled to room temperature
- 2 tablespoons Marsala wine or dark rum (optional)
For the Mascarpone Cream
- 4 large egg yolks, room temperature (pasteurized if preferred)
- ½ cup (100 g) granulated sugar
- 16 ounces (450 g) mascarpone cheese, room temperature
- 1 cup (250 ml) heavy cream, well chilled
- 1 teaspoon vanilla extract (optional)
Assembly & Finish
- 24 Italian savoiardi ladyfingers (about 200 g)
- 2–3 tablespoons unsweetened cocoa powder, sifted
- ½ ounce (15 g) dark chocolate, for curls or shavings (optional)
You don’t need a professional kitchen to make tiramisu — just a few tools you likely already own:
- Moka pot, espresso machine, or capsule brewer (for strong coffee)
- Heatproof mixing bowls (for whisking yolks and mascarpone)
- Small saucepan (for a double boiler setup)
- Hand whisk or electric hand mixer (to whip yolks and sugar)
- Rubber spatula (for folding cream)
- Electric mixer (for whipping cream)
- 8 × 8 inch (20 × 20 cm) glass or ceramic baking dish (for layering)
- Fine mesh sieve (for dusting cocoa)
- Offset spatula or spoon (for spreading cream)
- Sharp knife (for clean slices)
Most tools featured here can also be found in our [Italian Kitchen Essentials Guide].
1. Prepare the Coffee
- Brew a strong espresso using a moka pot or espresso machine.
- Let it cool to room temperature.
- Stir in Marsala wine or rum if desired.
- Pour the coffee into a shallow dish large enough to dip the ladyfingers.
2. Set Up the Double Boiler
- Fill a saucepan with 1 inch of water and bring it to a gentle simmer.
- Place a heatproof bowl on top, ensuring the bottom doesn’t touch the water. This gentle heat cooks your egg yolks perfectly without scrambling
3. Make the Zabaglione Base
- Add the egg yolks and sugar to the bowl.
- Whisk constantly for 4–6 minutes until pale, thick, and about 150°F (65°C).
- The mixture should fall in ribbons when lifted.
- Remove from heat and let cool for 5 minutes.
4. Smooth the Mascarpone
- In a separate bowl, gently stir the mascarpone cheese with a spatula until smooth.
- Avoid overmixing to keep its rich texture intact.
5. Combine the Zabaglione and Mascarpone
- Whisk one-third of the mascarpone into the yolk mixture until smooth.
- Add the remaining mascarpone in two more additions, mixing gently after each one.
- Stir in vanilla extract if using.
6. Whip the Cream
- In a chilled bowl, whip the heavy cream until soft peaks form. When you lift the whisk, the cream should curl slightly at the tip.
7. Fold the Cream into the Mascarpone Mixture
- Using a spatula, gently fold half the whipped cream into the mascarpone mixture. Add the rest and fold again until fully combined and airy.
8. Prepare the Baking Dish
- Use an 8×8-inch glass or ceramic dish.
- For easier slicing later, line the bottom and sides with parchment paper.
9. Dip the Ladyfingers
- Quickly dip each ladyfinger into the cooled espresso for 1–2 seconds per side.
- Do not soak them — they’ll soften as the tiramisu chills.
10. Create the First Layer
- Arrange a single layer of dipped ladyfingers across the bottom of the dish.
11. Add the Cream Layer
- Spread half of the mascarpone cream evenly over the ladyfingers using an offset spatula or spoon.
12. Add the Second Layer
- Dip the remaining ladyfingers into the coffee and arrange them evenly on top of the first layer.
13. Finish with the Final Cream Layer
- Spread the remaining mascarpone mixture evenly over the top. Smooth the surface with a spatula or create light swirls for texture.
14. Chill the Tiramisu
- Cover tightly with plastic wrap and refrigerate for at least 6 hours, ideally overnight (12–24 hours) for the best flavor and structure.
15. Add the Finishing Touches
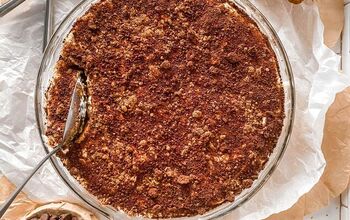
- Just before serving, dust the top generously with unsweetened cocoa powder using a fine mesh sieve. Add chocolate curls or shavings for garnish if desired.
16. Slice and Serve
- Use a sharp knife dipped in hot water for clean slices. Wipe the knife between cuts. Serve chilled and enjoy your authentic Italian tiramisu.
Quick Tips for a Successful Authentic Tiramisu Recipe
- Don’t over-soak the ladyfingers — 1–2 seconds per side is enough.
- Chill overnight for the richest flavor and perfect texture.
- Use strong espresso for an authentic Italian taste.
- Keep it cold — serve tiramisu straight from the fridge.
- Make it ahead! The flavor deepens beautifully by the next day.
This tiramisu recipe is creamy, light, and bursting with flavor. It's everything a dessert should be! Each spoonful offers the perfect harmony of espresso, sweet mascarpone, and cocoa that lingers on your tongue. It’s no-bake, stress-free, and actually gets better the longer it chills. The aroma of coffee, the silky mascarpone, and the cloudlike texture make it irresistible. Elegant enough for guests and simple enough for any day, it’s the ultimate dolce to end your Italian meal.
The beauty of an authentic tiramisu recipe lies in its simplicity, but it rewards a gentle touch. Use strong, freshly brewed espresso; a stovetop moka pot is traditional and brings unmatched depth. Avoid instant coffee, which lacks richness.
Don’t rush the mascarpone. Stir gently until smooth and avoid overmixing to prevent graininess. When folding whipped cream into the mascarpone base, use broad, slow motions to keep the texture light.
Dip ladyfingers for no more than one second per side to maintain their structure. Patience is key, as tiramisu needs time to chill—ideally overnight. Think of it as the dessert version of Sunday sauce: the longer it rests, the better it tastes.
Tiramisu may be a modern dessert, born in the 1960s in Treviso, Veneto, yet it quickly became an Italian icon. Its name, “tirami su,” literally means “pick me up,” a nod to the espresso and cocoa that deliver comfort and energy in a single bite.
By the 1980s, tiramisu had spread throughout Italy and across the globe. It came to represent Italian creativity and balance, where rustic ingredients are elevated into elegance. Today, it remains one of Italy’s most beloved desserts, appearing everywhere from humble trattorias to Michelin-starred restaurants.
In the Italian dining tradition, tiramisu appears as il dolce (dessert), the sweet finale to a balanced meal that begins with antipasto and ends with coffee. It’s often reserved for Sunday lunches and celebrations, serving as a closing act of sweetness and satisfaction.
In Italy, meals follow the traditional Italian meal structure, a time-honored sequence of courses from aperitivo to dolce that celebrates balance, flavor, and culture. Want to dive deeper into how Italians eat and see where this dish fits in the rhythm of an authentic Italian dinner? [Explore our full guide to the Traditional Italian Meal Structure here.]
- Appetizer: Bruschetta al Pomodoro — light, bright, and fresh.
- Main Dish: Spicy Rigatoni alla Vodka — a bold pasta balanced by tiramisu’s cool sweetness.
- Wine: Vin Santo or Marsala — classic Italian dessert wines that complement the cream.
- Dessert Pairing: Cannoli for a classic Italian dessert duo.
- Coffee: Espresso or Cappuccino — the traditional Italian finish.
- Alcohol-Free: Skip the Marsala or rum and use espresso only.
- Gluten-Free: Use certified GF ladyfingers.
- Fruit Twist: Add layers of strawberries or raspberries for a summer variation.
- Chocolate Lovers: Drizzle melted dark chocolate between layers.
- Nutella Tiramisu: Spread a thin layer of Nutella before adding cream.
- Individual Servings: Assemble in glasses or jars for elegant single portions.

1. Prepare the Coffee
- To begin, brew a strong espresso using a moka pot or espresso machine.
- Once brewed, let it cool to room temperature. If desired, stir in Marsala wine or rum for added depth.
- Then, pour the coffee into a shallow dish wide enough to dip the ladyfingers.

2. Set Up the Double Boiler
- Meanwhile, fill a saucepan with 1 inch of water and bring it to a gentle simmer.
- Place a heatproof bowl on top, ensuring the bottom doesn’t touch the water. This setup provides gentle heat to cook your egg yolks without scrambling them.

3. Make the Zabaglione Base
- Next, add the egg yolks and sugar to the bowl.
- Whisk constantly for 4–6 minutes until the mixture becomes pale, thick, and reaches about 150°F (65°C). It should fall in ribbons when lifted.
- Once ready, remove from heat and let cool for 5 minutes.

- While the zabaglione cools, gently stir the mascarpone cheese in a separate bowl using a spatula until smooth.
- Be careful not to overmix, as this helps preserve its rich texture.

5. Combine the Zabaglione and Mascarpone
- Then, whisk one-third of the mascarpone into the yolk mixture until smooth.
- Add the remaining mascarpone in two more additions, mixing gently after each one. At this point, you can stir in vanilla extract if using.

6. Whip the Cream
- In the meantime, whip the heavy cream in a chilled bowl until soft peaks form.
- When you lift the whisk, the cream should curl slightly at the tip.
7. Fold the Cream into the Mascarpone Mixture
- Now, using a spatula, gently fold half of the whipped cream into the mascarpone mixture.
- Add the rest and fold again until fully combined and airy.
- Before assembling, prepare an 8×8-inch glass or ceramic dish.
- For easier slicing later, line the bottom and sides with parchment paper.

- Quickly dip each ladyfinger into the cooled espresso for 1–2 seconds per side.
- Avoid soaking them — they’ll soften naturally as the tiramisu chills.

- Next, arrange a single layer of dipped ladyfingers across the bottom of the dish.

- Then, spread half of the mascarpone cream evenly over the ladyfingers using an offset spatula or spoon.

- Continue by dipping the remaining ladyfingers into the coffee and arranging them evenly on top of the first layer.

- After that, spread the remaining mascarpone mixture evenly over the top.
- Smooth the surface with a spatula or create light swirls for texture.
- Once assembled, cover tightly with plastic wrap and refrigerate for at least 6 hours — ideally overnight (12–24 hours) — to allow the flavors and structure to develop fully.

- Just before serving, dust the top generously with unsweetened cocoa powder using a fine mesh sieve.
- For extra flair, add chocolate curls or shavings if desired.

- Finally, use a sharp knife dipped in hot water for clean slices, wiping the blade between cuts.
- Serve chilled and savor your authentic Italian tiramisu.
Traditional tiramisu recipes from Italy often include Marsala wine or rum in the coffee dip. However, you can make a delicious alcohol-free tiramisu by using only espresso.
Can I make authentic tiramisu without raw eggs?Yes! Many homemade tiramisu recipes use pasteurized egg yolks or gently cook the yolks with sugar over simmering water (a zabaglione base). This makes the dessert safe while keeping the authentic creamy texture.
What is a good substitute for mascarpone in tiramisu?Mascarpone is essential for classic Italian tiramisu, but if you can’t find it, mix cream cheese with heavy cream as a backup. The flavor won’t be exactly the same, but it’s a workable option for an easy tiramisu recipe
How long does tiramisu need to chill before serving?The best tiramisu is made ahead and chilled at least 6 hours, ideally overnight. This resting time lets the flavors meld together and keeps the layers firm.
How long does tiramisu last in the fridge?Homemade tiramisu will stay fresh for about 3 days if covered and refrigerated. Always keep it chilled, since it’s a no-bake dessert with dairy.
Is authentic Italian tiramisu an easy recipe for beginners?Yes! It’s a no-bake dessert with just a few simple steps. Once you try it, you’ll see why it’s one of the most popular Italian desserts worldwide.
Can tiramisu be frozen?Yes, tiramisu freezes surprisingly well. Wrap individual slices tightly and freeze for up to 2 months. Thaw overnight in the fridge before serving.
How do you keep tiramisu from getting soggy?The secret is to dip each ladyfinger quickly — just 1 second per side in espresso. Over-soaking is the most common mistake, and it leads to mushy layers.
How do you pronounce tiramisu?In Italian, it’s pronounced “tee-rah-mee-SOO.” The word literally translates to “pick me up” — both for its coffee kick and the comfort it brings.
- Make Ahead: Tiramisu tastes best when chilled overnight, letting the flavors meld beautifully.
- Storage: Keep covered in the fridge for up to 3 days.
- Freezing: Freeze individual slices for up to 2 months; thaw overnight in the fridge.
- Pro Tip: Always dust cocoa powder just before serving for the freshest aroma.
- Calories: 330
- Total Fat: 21 g
- Saturated Fat: 12 g
- Sodium: 85 mg
- Carbohydrates: 30 g
- Dietary Fiber: 1 g
- Sugars: 15 g
- Protein: 6 g
Values are approximate and may vary based on ingredients and portion size.
Dietary Tags: Vegetarian · No-Bake · Family-Friendly · Beginner-Friendly Italian Dessert · Gluten-Free Adaptable
Loved This Tiramisu Recipe? Let’s Keep Cooking Together!
This classic tiramisu brings the elegance of Italy to your table — creamy mascarpone, bold espresso, and cocoa in every bite.
If you try this recipe, share your creations and tag on:
📬 Want more? Get Weekly Italian Recipes in Your Inbox. Authentic recipes, cooking tips, and behind-the-scenes stories straight from our kitchen. Subscribe here.
Tiramisu
Recipe details
- 12 Slices
- Prep time: 25 Minutes Cook time: 6 Hours Total time: 6 hr 25 min


Comments
Share your thoughts, or ask a question!